|
The Schober Reverbatape
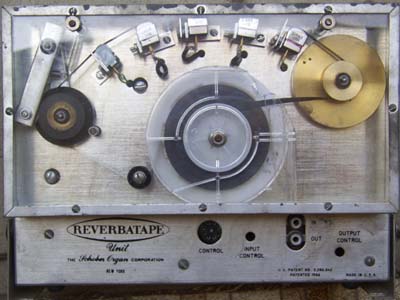
A Reverbatape modified to use a spooled endless tape taken from a cartridge.
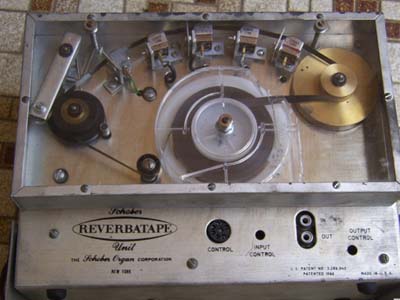
Another view of the modified Reverbatape. The following comments are from R.A.B. Tarrant of Schober Organs (Australia), referring to the Schober Reverbatape when used in Australia. If persisting with the Reverbatape, some of these modifications may be worth considering. They are quoted verbatim from correspondence. On heat produced by the motor: One thing you ought to do with the Reverbatape is to drop the voltage going to it. The best way is to insert an ordinary electric lamp socket in one of the leads carrying 115 volts to it and the motor from the plug in the side of your PRCS-2 Power Supply; you then plug a 60 or 75 watt lamp in the socket. This results in a decided drop in heat from the motor, yet does not seem to affect the performance - either electric or electronic - one scrap. I believe that you can get a result as low as 95 volts....If you can think up a simpler way of dropping the voltage, safely, then let me hear of it! On hum and vibration: Hum in the RV-3A. It is very susceptible to stray magnetic fields and I have had cases, too, where it has picked up generator hash. Also, I mount my own RV-3A on a sandwich of two pieces of masonite with sponge rubber for the filling. The lower masonite sheet is held away from the toeboard of the organ on two L-brackets and the RV-3A sits atop the upper bit. (You may need a rubber band or such to hold the unit in the true upright position, as it tends to fall forward - and that's very much out.) On the motor in general: Jim found two major failings with the RV - both mechanical faults, and if you have not realized this, you will have them, too. The first is that the motor is a pretty basic, old gramo unit and designed to have the drive shaft operate in the vertical plane. As it runs in the horizontal, it needs to be better bushed and with better bearings and, in addition, under stroboscopic light one can see the shaft oscillate in and out, just a fraction - but enough to impart wow to the tape loop. So, Jim does up the bearings and also adds a pressure spring thingo which presses, per a ball bearing, on to the rear end of the drive shaft, holding this firmly forward. The other thing is that the motor is designed to run off a 60 hz supply. Running, as it does, off a 50 hz one, the drive is only 5/6ths the speed at which the loop should go. This does make a difference, too, as they have carefully worked out that one for optimum performance.
Apparently Jim Gosling was hired by Schober Organs (Australia) to modify the Reverberate en-mass, though not all Reverbatapes were done. One of mine has the modifications, and despite this has a clacking sound associated with the motor. Apply pressure to the side of the shaft at the rear, or running the unit on its back stops this, suggesting lateral wear in the motor bushes. The other does not have the modifications, and has 1/4" play in the motor shaft! Another suggested modification was to isolate one of the motor power wires, and run it though a separate switch, so the motor could be switched out when reverb was not needed. This achieved two things - mechanical silence, and reduced wear. How much difference did this make? Of my two tapes, one has moderate, but acceptable wear to the heads, while the other (non switched) one has major grooving to the heads - so bad in fact that the heads were starting to behave like files on the tape loops, rapidly scrubbing grooves into the tape loop and throwing oxide everywhere.
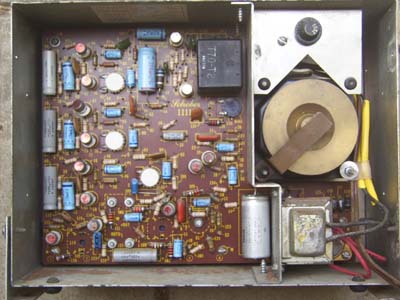
The rear of a Rev 3A Reverbatape with Australian modifications.
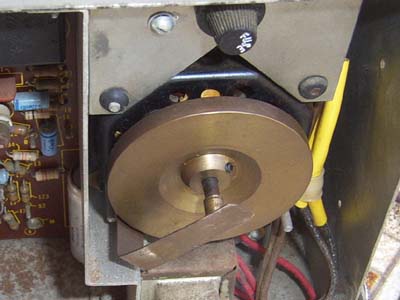
A close-up of the Australian modifications to the flywheel.
A circular released to the Schober Organ Club in Melbourne: -: SCHOBER REVERBATAPE :- REFER TO THE DRAWING IN YOUR SCHOBER LITERATURE: Following our discussion on the Schober Reverbatape at our 1ast meeting, set out below is a list of improvements that were originated by our secretary-treasurer Errol De Cean, to ensure smooth and even tape transport, thus eliminating the wow which most of us have experienced in the Reverbatape as supplied. The most effective modifications are listed first, and it is up to the individual owner as to how far he wishes to proceed down the list. 1. The prime cause of wow is between the motor shaft and the rubber roller. This can be cured by two modifications, both of which must, be done. One is not very effective without the other. (a). Roughen (striate) the motor shaft which is normally in contact with the rubber pinch roller using a new and sharp medium coarse flat or half round file (Note: Do not have the motor running for this operation). Using a filing action at right angles to the axis of the motor shaft allow the shaft to rotate under the file whilst applying pressure. It may require two or three applications. (b). Install a tension spring between arm carrying the rubber roller and a small lug located just under where the wires for the erase head emerge from the face of the panel. The lug can be a small electrical lug bent at right angles and attached to the panel by a suitable metal self tapping screw. (I ran mine up to the long bolt used to secure the cover. Not the ideal angle, but it worked.) 2. Install a heavier motor flywheel. (at this point, the document suggested referring to Errol De Cean, but alas I have not seen him in 25 years, so we are on our own here.) 3. Replace polished cylinder in the tape tension arm with a roller fitted with ball bearings. 4. Make sure the inertia wheel runs freely. because of its weight in relation to its small axle, a ball bearing here is not essential. However it must run freely. Test it by spinning it without the tape loop in place. It should run down very slowly. One drop of sewing machine oil is ample for its lubrication. (Note: Do not over oil).
As mentioned above, carrying out item 1 will give the greatest improvements, probably 60 or 70 per cent, items 2,3, and 4 making up the rest. Item 4 costs nothing, so it is worthwhile ensuring free running here, but it will contribute very little if item 1 is not done first. Cleanliness of tape heads should be checked frequently, as even if the above items are done, a subsequent falling off in performance can be caused by clogged heads. In fact anything at all that causes drag on the tape, no matter how minute, can result in wow. A little methylated spirits (from the chemist, not the hardware store) on a piece of cotton wool is a good head cleaner. Wipe dry before re-installing the tape loop. (Ken: Or use tape head cleaner.) A worn tape will still work, but one with kinks should be discarded. Some later tape loops are not "welded" at the join, but held with a piece of tape splicing tape on the back. Under the constant load of the tension arm, these tapes creep at the join. This exposes the tacky adhesive of the splicing tape which then becomes deposited on the tape heads, thus attracting more oxide from the tape, and the whole sticky mess puts a brake on the tape movement with erratic transport which results in more wow.
Article, art & design copyright 1999-2003 by Ken Stone
|